Takeaway Equipment Settings
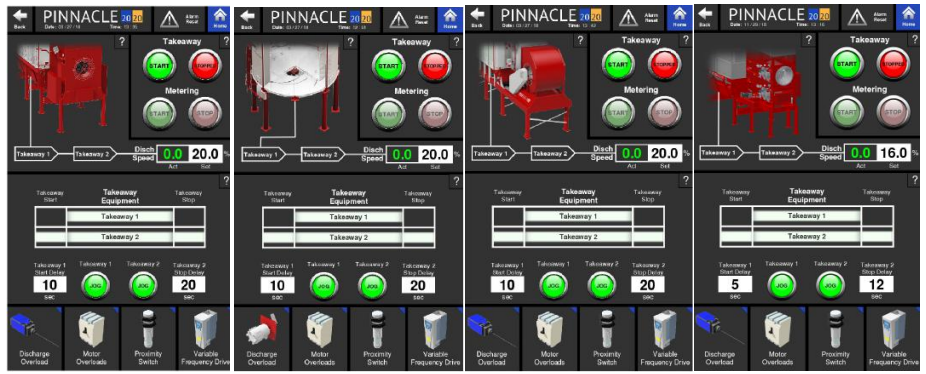
The second of the six options under System Settings is Takeaway Equipment Settings. By selecting the Takeaway Equipment Settings option, the operator will be taken to a page dedicated to all settings pertaining to the takeaway.

Just as can be done on the Control page, the discharge system can be started and stopped from the Takeaway Equipment Settings page as well and the buttons behave in the same manner.
Discharge Speed
The upper section of the Takeaway Equipment Settings page features a rendering of the takeaway portion of the dryer as well as some values in boxes labeled Discharge Speed. The actual metering or sweep speed is shown in the box labeled "Act", and the desired speed can be entered in the box labeled "Set" provided the dryer is discharging in Manual mode.
Discharge System
It is important to have a good understanding of the discharge system and it's design. This design provides versatility for different dryer sites. Some sites will utilize the features and components that make this system versatile while others will not need to. The system consists of two signals named Takeaway 1 and Takeaway 2.
Takeaway 1 Signal
The Takeaway 1 signal runs the discharge auger on profile dryers as well as any other equipment that is connected to it. Any other equipment that shares the Takeaway 1 signal will start and stop with the discharge auger of a profile dryer. Since the tower dryers do not have a discharge auger, nothing is connected to the Takeaway 1 signal from the factory. However, the signal is there to be used to run other equipment if so desired.
Takeaway 2 Signal
The Takeaway 2 signal is meant for equipment further downstream from equipment tied to the Takeaway 1 signal. Again, this signal is provided for convenience and is only to be used to run other equipment if so desired.
Takeaway 1 Start Delay
This is an adjustable timer inside the PLC that allows the dryer's takeaway equipment to start in stages. When the Takeaway Start button is pressed, equipment tied to the Takeaway 2 signal starts operating immediately and the timer starts its countdown. When the timer expires all equipment using the Takeaway 1 signal will start.
Takeaway 2 Stop Delay
This is an adjustable timer inside the PLC that determines how long to run the Takeaway 2 equipment after the Takeaway Stop button has been pressed. The timer starts once the Takeaway Stop button has been pressed and continues to run the Takeaway 2 equipment until the timer expires.
Takeaway 1 and 2 Jog
These two jog buttons enable the user to momentarily turn equipment on that are tied to these signals. This is useful when there is a backup or blockage of grain. Pressing and holding the Takeaway 1 Jog button will turn on all equipment tied to the Takeaway 1 signal for as long as the button is pressed. Releasing the button will stop the equipment. The Takeaway 2 Jog button works the same way for equipment tied to the Takeaway 2 signal.
Metering
The metering buttons only control the metering rolls or sweep. They do not control the takeaway.
Discharge Graphic
This graphic is used to give a real-time illustration of the operating components of the discharge system. When the discharge system is off, nothing on the graphic will be illuminated and the line exiting the dryer with the Takeaway tags will be white. Once the Discharge system is turned on, the Metering, along with the line exiting the dryer with the Takeaway tags will illuminate green. A flashing green graphic of any portion of the Discharge system indicates that the equipment for that particular portion of the system is currently running.
Takeaway Sequencing Chart
The bottom half of the Takeaway Equipment Settings page contains a chart that illustrates the sequencing of the discharge system and associated timers. The green, horizontal lines within this chart indicate when different operations are starting, running, and shutting down. Under this chart are the two, previously discussed, adjustable timers used to control the timing of the equipment associated with the discharge system.
Takeaway Start-Up Sequence
Following the logic of the chart, pressing the Takeaway start button will cause the start up of the Takeaway 2 equipment. At the same time, the Takeaway 1 Start Delay timer will begin its countdown. Once the countdown expires, the Takeaway 1 equipment will begin operating.
Takeaway Shut-Down Sequence
Following the logic of the chart, pressing the Takeaway stop button will immediately stop the equipment associated with Takeaway 1. At the same time, the Takeaway 2 Stop Delay timer will begin its countdown. Once the countdown expires, Takeaway 2 equipment will shut down.
Last updated
